

Hi and welcome back.
In the last blog, I went through how to start a portrait. This blog shows stage 2 in my portrait process.
I’m going to show:
- How you place the eyes, nose and mouth so they don’t look just plain weird.
- How you use mathematics to recognise people and why this is important.
- How your TV can help you draw better.
- Why its better not to draw with your paper flat on a table.
- How to test your drawing.
- How to complete adding the outline.
Stage Tracing
Before we start, I’d mentioned stage tracing previously. This allows you to time travel like you might do in Word with CTRL Z, by returning to a previous version. Simply put, you trace what you’ve done so far. If you find your picture isn’t going the way you want, get a new sheet of drawing paper, and then a separate sheet of A4. Take your pencil and scribble over the paper so that most of it is covered in pencil. Tip: You’ll find this easier if you use the flat of the pencil lead by using the pencil on its side.
Once you’ve finished, get your new sheet of drawing paper, lay the pencil side of the paper you’ve just covered in pencil, pencil side down on top of it. Then put your tracing on top of that. Then draw over your tracing again, following the lines exactly. Once you’ve finished, take away the tracing paper and and pencil sheet and you should have a copy of the tracing on your new drawing paper. All that’s left it just to gently erase anything that’s not your original lines.
On with the picture …
Ok, back to the portrait, which should at the moment look something like this:

How you place the eyes, nose and mouth
After the outline, the next most important thing is where the eyes, nose and mouth are positioned. Maths comes in here believe it or not. Whenever you see someone’s face, your brain stores the relative positions of the eyes, nose and mouth in a form of triangle. When you see them next, be it in person, in a photo or in a drawing, your brain compares what it sees with its database of coordinates. Once it finds a match, it knows who the person is, regardless of what angle you view them from (as long as you can still see their face).
If these aren’t correct in your drawing, then people simply won’t recognise who it is. If they’re right, lots of other things can be wrong with your picture but they’ll still recognise who it is.
Look at the source photo, and see where the eyes are. Draw the outline of each eye, not the eyelids or the eyebrows – just the outline of each eye. Something like this:

This is the eyes area blown up:


You probably know that eyes aren’t round, at least not the part that you can see. This is why you draw just the outlines. The rest can be added later. At the moment you just want them in the correct position – which is just about halfway down the face (including hair, which masks where the top of the skull is).
If you look carefully, you’ll see something else that’s odd, and which you have to try to replicate. In fact if you look at it long enough you wonder how it can be? The eyes are not at the same level. Put a pencil horizontally across the right eye so that its covered, then see how much of the left eye is still visible. This is caused by Meghan cocking her head slightly and because she has ever so slightly elevated the left hand side of the face while smiling – otherwise her eyes would be at the same height.
Working out where the mouth goes
The first thing you do is work out where the centre of the bottom of the bottom lip is in relation to the bottom of her chin, and draw a rough line where you think it is. Then referencing the photo, draw in a rough line where the centre of the top of the top lip is.
Look back at the photo. Note what lines up with the extreme left and right edges of the lips, (the edges in this photo). The centre of the pupil in Meghan’s right eye, and the extreme edge of the white of the eye in Meghan’s left eye.
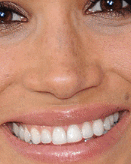
You can now use these as visual guidelines when drawing the lips in. Effectively its learning to draw what you see, but they’re handy references.
Now draw the outline of the mouth in – remember we’re just after checking everything is in the right place. Tip: Notice in this photo, that because Meghan’s face is tilted, the mouth is at an angle.
I’ve drawn in light guidelines here to show where the lips stop:

Kind of looks a little odd without the nose, but bear with me, that’ll all change with the next section.
Working out where the nose goes
With reference to Meghan’s photo, look for the lowest point of the nose and add a light upturned curved line to show where this is. It makes an immediate transformation, especially if you appreciate Manga which always use minimalist features. You’ll build on this. Now use the technique we used before and look for the extreme left and right hand edges of the nostrils and then add two light guidelines running down from the eyes. Inside these two lines and a little way above the line you created before, draw two more curved lines for the outer edges of the nostrils, i.e.

Now draw the remainder of the profile of the lower section of the nose.

That’s the eyes nose and mouth in position, admittedly just the outline, but all you should do at this stage. I wasted a lot of time in my early drawings adding detail because I was enjoying it rather than doing the basics and checking everything was in place. Not much fun when you have to remove detail you’ve added or worse still start again.

Tip: The smoother the paper you use, the easier it is to pull out detail you’ve added and move it or replace it.
I use Bristol Board which is just about the smoothest paper you can buy.
How your TV can help you draw better
Hang on I hear you say, isn’t this art stuff supposed to get me away from the TV?
Well yes, it will but that doesn’t mean it can’t help you. If you HDMI up your laptop to the TV with a great long cable, you can display your source picture there. If you have a smart tv, even easier – just find the photo on Google and display it.
What are the advantages to bothering? You can draw at an easel, it just about replicates what it would be like to draw someone in front of you, and you get HD image quality in large format so you don’t lose a detail.
Why its better not to draw with your paper flat on a table.
Have you ever seen those pavement illusions where someone paints a swimming pool that isn’t there or something similar? If you walk up to the image rather than looking from distance as you’re supposed to, it changes completely and the illusion is lost.
If you draw with paper flat on a table, unless the subject is flat on the table beside it, or you draw right overhead the driving, you’ll get distortion because you’ll have been working at an angle. If you stand up the paper and look it, the portrait will either be lengthened or shortened. This is why you should draw with the paper as upright as you can, as this minimises the chances of you adding distortion. Try it out and see what happens. You don’t have to do a full picture – just do an outline and you’ll see it for yourself.
How to test your drawing
This is really cool. If you’re starting out by drawing from photos, this technique will show you how you can test any size drawing made from the original photo. When would you do this? If you have a small photo and want to draw from it, or you want to draw something larger than A4, you want a reliable easy way to check that everything in your drawing is in the right place. This is how you do it.
1. Get an A4 acetate (clear plastic) sheet.
2. Reduce your source photo so that its smaller or the same size as your drawing.
3. Using a marker draw roughly around the face outline and the features you’ve added so far. (It looks really weird – you’ll get over it).


4. Take the sheet and hold it above your drawing.

5. Move it closer until the eyes nose and mouth are superimposed. (You’ll find this a lot easier if you close one eye).
If there’s a good match, you’ve got reasonable similarity between the positions of these features on your drawing and those in the photo. If not, see which are the most accurate when compared to the face outline, and move the one that’s most wrong. Obviously you have more work to do if there’s two out of position.
This will save you hours trying to work out what’s wrong.
The closer you can get the outlines of the features, the better your picture will be, so continue with this until you’re happy.
How to complete adding the outline.
Next add in rough outlines of as much as you can.
In this photo, Meghan’s right ear sits between the top of the visible part of her right eye and the tip of her nose. This isn’t always true – how the subject has inclined their head, and their age affects this rough guide. (People’s ears grow larger and longer as they age).
This is with minimum outlines added.

The face outline looks a little out to me (at the top), but it can be corrected when the hair part of the outline is removed. Most of the lines you currently see will be removed, as in reality, they don’t exist.
Its not worth outlining everything, in case you need to adjust things. If the eyes, nose and mouth are correctly orientated with each other and the face outline is correct, this gives you more confidence to start on the next stage which is adding a little more detail to the features (eyes, nose, mouth and ears. Once this is done you can start to add tone which will start to bring what is just a flat contoured picture to life.
Next Time …
I’ll be tackling these two areas next time. If you’re following along, take a stage tracing if you haven’t done already, and try to get your picture to the same stage.
It would be great to know how your pictures are turning out. If you have comments, questions etc, or would like to ‘like’ this article or follow it so you don’t miss the next one, you should be able to find buttons on screen to let you do this.
NB: The LIKE and FOLLOW buttons and links are hidden (a bit). If you click the button with the three horizontal lines at the top of the blog, you should then see them.
Thanks for reading this. I hope its been useful.
I hope that you can join me next time, and good luck with your drawing.
All the best. Ian. 

Nice method! I too make portraits if you could take time and see mine on my blog and tell me the mistakes you think I need to take care of, I want to improve my portraits..
LikeLike