Art, How to draw portraits, Learning how to draw, Portraits

Drawing a Portrait – Stage 6

Hi,

This post kind of wraps up the Meghan Markle picture.

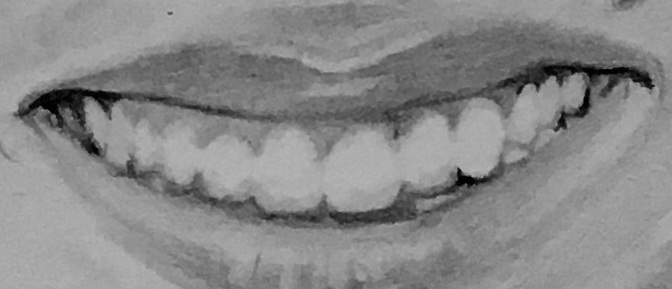
If you’ve been following along, the picture had got to this:

IMG_3290_crop

There were a few things I wasn’t happy with, and if the truth be told, its very easy when drawing a picture to never be completely happy with it.  There’s always a thought that “oh if I just adjust that slightly” but more often than not it turns to overworking the picture and potentially wrecking it, which I’ve done in the past.

Nowadays I get the picture to this point and call it a version.  I know that redraws are often better than the original version, and part of this is the fact that in your mind, you are now familiar with the subject’s face structure and can manage to replicate it, but better and with less working, whilst contributing less wear to the paper which gives a smoother look.

Something else I do is leave a picture for several weeks without doing anything to it, and then view it again with ‘fresh eyes’.  Issues leap out of the page at you – not necessarily things that a casual viewer would be able to detect but that nevertheless distance it from being correct.

That opens up the question of what you want at the end of the day – do you want something that is so photo-realistic that viewers think it is a photo, and in doing so remove the opportunity of an artist’s impression, or do you want something that goes past a copy of the photo and produces a new picture from the source.

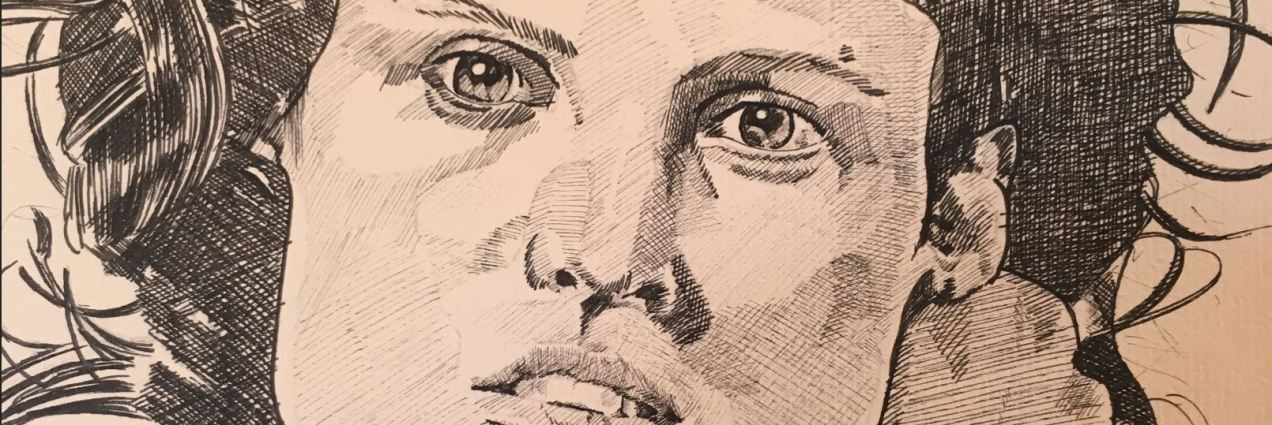
When I look at my ink work, there is no way that it is even going in the direction of photo-realism but they have a ‘grab’ factor anyway, or at least to me.  (Not that I’m egotistical enough to think that my pencil pictures are).

‘Grab factor’ is that certain something that makes you take a second look at a picture.  I think in this visually deceptive age, that people have become unconsciously blase about what they see in art and film.  What can be accomplished with digital art and CGI processing in film is light years beyond what it was 10 years ago.  The recent Star Wars films use CGI for several actors who had sadly passed on, and the finished shots were great.  What can be done in a fraction of the time in these formats still takes a pencil artist a long time, but the effort becomes understated because people now think that it’s easy to do.

Perhaps I’m moving in the direction of ink because it isn’t so easy to get right and it distances me from the batteries of artists doing photo-realistic pencil.  Not in a ‘better’ way – just different, and to me more individual.

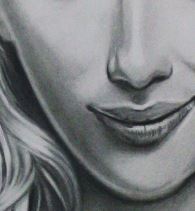
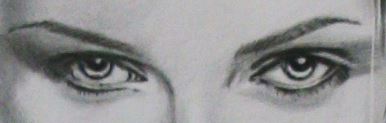
Anyway, back to Meghan, who now looks like this:

IMG_3301_crop_enhance

So what’s changed?

IMG_3290    IMG_3301_crop_enhance

Ignore the fact that the left hand pic is darker – it just that I’ve balanced the light in the photo of the latest version.

  • A medium tone background has been added.
  • The hair has been darkened and has had (light) highlights added.
  • The edges of the hair where it meets the background, has been defined.
  • Stray hairs have been added.
  • Skin tone below the neck has been darkened.
  • The eyes, top eyelids and eyebrows have been overlaid with softer (darker) pencil.

I think the darker background works better.
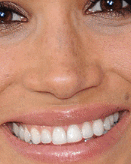
The hair darkening was a response to my thought that in the original photo Meghan looks like she has black hair, but my stage photo made it look like she’s a brunette.   I think it could still be made darker.  The technique I used was to apply layers of tone over the hair, add single lines to provide some definition (but not every single hair – less is more with this).

The added tone in the background is a little rough, but the paper has had so much eraser work on it, that its chopped and far from the pristine Bristol smoothness it was in when I started.

I’m happy with this as a version.  A new version might be better but to be honest I need to do something else – this picture’s now been in development a little too long.

So what do you when the picture’s finished?
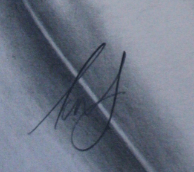
Signing

It’s become ‘unfashionable’ to sign work, but there’s nothing stopping you – I always think it tells the world you drew it when they ask whether you really did.

example signature

Protecting it

Not the putting it in a mission impossible style bank, but applying lacquer to prevent it accidentally being smudged.  The easiest way to do this is cheap hairspray.  Good old PoundLand hairspray is perfect.

Hairspray is simply glue with perfume added, and carried in gas as you spray.  You can buy expensive hairspray if you want but it’ll have more perfume in it, which may darken the picture.  You can also get fancy lacquer spray in art shops or online, but its simply the hairspray without perfume and is usually expensive.  Don’t spray the picture too much – it’ll take a long time to dry and may bleed what you’ve drawn especially if you’ve also used ink pens.

Displaying it

Either display it in a portfolio book – orderable online, in art shops or Staples, or frame it in a picture frame.  If you buy a portfolio, and are not using hairspray to bond the pencil, don’t buy the cheapest one you see – after a while, you’ll find that unprotected pencil drawing produces a shadow on the plastic sleeves and while doing so, lightens the picture.

This is an example of a portfolio book:

IMG_3303


If you’re putting it online, take care to add a mask on top, including the words “Copyright” and your name.  That way its more difficult for people to download the image and print it off.  If you want people to be doing that, they should be paying for the privilege.  Sites advertising works for sale add their own masks to safeguard the picture from being downloaded as is.

Next (from you)

‘Next’ is up to you.  Find something you want to draw, apply the techniques here if you want, and start discovering how to draw portraits.  The more mistakes you make the better.  You’ll learn what works, what doesn’t and how to apply fixes.  Try to write down the process in a journal if you can, for review later, or better still stage photo your work and add notes as text. for things that have worked, things that didn’t and the techniques you’ve used.

Next from me

Next from me is a long overdue commission for one of my friends, and on here a tutorial on pop-art picture drawing.  If you fancy seeing that, I look forward to sharing the process with you next time, or at the least the first stages, of a colour pop-art picture of Gal Gadot’s Wonder Woman.

This is an example of a pop-art picture of the farewell scene in Casablanca:

IMG_3302

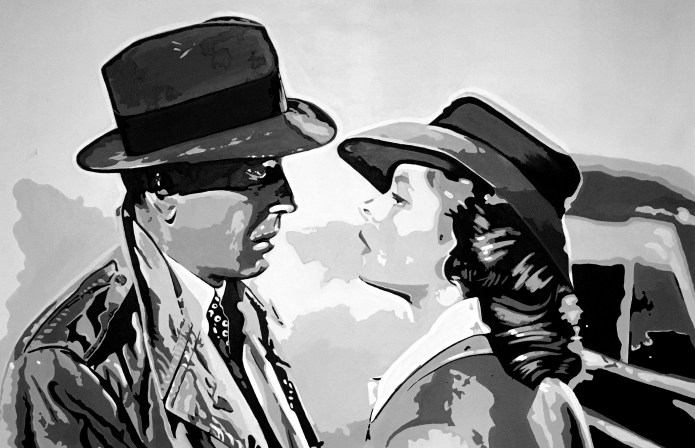
If this makes no sense at all, IMDB reviews the multi Oscar winning film here.

If you’re working on your own pictures it would be great to know how they’re turning out.  If you have comments, questions etc, or would like to ‘like’ this article or follow it so you don’t miss the next one, you should be able to find buttons on screen to let you do this.

NB: The LIKE and FOLLOW buttons and links are hidden (a bit).  If you click the button with the three horizontal lines at the top of the blog, you should then see them.

Thanks for reading this, best of luck with your drawing and I look forward to seeing you next time.

All the best.  Ian.  smiley-1306301-639x623


Standard
Art, How to draw portraits, Learning how to draw, Portraits

Drawing a Portrait – Stage 5

Hi,

If you’ve been following this series, you’ll have seen how to draw a portrait of Meghan Markle to the stage shown below:

Meghan stage 4

This blog takes things a little further.

Meghan stage 4IMG_3290_crop

So, what’s changed?

  • Her hair and eyebrows have been more clearly defined and shine has been added.
  • Blemishes have been added.
  • Her teeth have been lightened.
  • Tone has been applied to the area below the left side of her lower lip and centre of the chin.
  • Material shadowing has been added to the shirt.

Hair definition

I’m not so good at free drawing hair but find that to make it look right, less is actually more.  I feel that if you define every strand it complicates the picture and makes it look forced.   They key is to get the hair tonally correct – light where it’s light and dark where it’s dark.

The light should follow the contours of the hair – where it’s closer to (you) it should be lighter.  If you think of it as the crest of waves at sea, that’s where the lightest area is.

As an example, in the shock of hair close to the right cheek, the hair bows out above her eye.  The fastest way to apply the light is to draw the hair in and then pull it out with a manual fine tipped eraser using a lot of pressure at the peak (or centre) and lessening as you move away in each direction so that the lighter area fades away slowly.

You may find this easier if you start off by drawing the lines in gently with a harder pencil so the lines are light, then go over the lines with a softer pencil.  Keep doing this until you’re happy with the tone when compared to the photo.

IMG_3290_crop2

Overall, I’m struggling with darkening down the hair enough – Meghan’s hair is very dark and here it looks mid toned, so if I did the picture again I’d concentrate on making the hair darker straight away.

Tearing

This picture has been drawn on what is called Bristol paper.  It has an almost photographic paper feel to it’s surface.  A problem with ultra smooth paper like this is that it can get ‘tired’ – overwork it too much (like trying to make the hair darker after a lot of work has been done) can tear the paper, and there’s nothing you can do once that’s done.  You get similar damage over a wider area if you’ve gradually worn away the surface, which you can do by drawing pencil in, then erasing and so on.

Torn or worn paper has more heavily grained paper at the surface and it accepts pencil a lot more readily – if you try to add tone when you have a tear or worn area, it’ll look markedly more distinct where this is, and you’ll struggle to apply a uniform tone.

2nd Attempt is often better

The more you work paper with damage the worse it gets.   I prefer to just stop working a picture when this happens and redraw the picture from fresh.  This sounds catastrophic but it can be very helpful.  If you redo a picture you’re likely to get a much better picture second time because your mind remembers the structure of the original and the mistakes you made, a little like knowing where potholes are in roads you use all the time when you’re driving.

Blemishes

It is alleged that Oliver Cromwell once instructed an artist to paint him ‘warts and all’ but there appears to be little actual historical proof that he actually said it.  Its a little like the alleged quote by President Bush that the french have no word for entrepreneurialism.  Probably never happened.  Blemishes are a two edged sword – include them and the sitter will ask what they are as if the artist has invented them. Leave them out and the painting can be criticised as being unrealistic.  I err on the side of adding them but kindly so they’re not too unflattering.  I was once asked by a customer why they had a mark in the picture which they weren’t aware of (but was clearly there) – that took some talking I can tell you.

Teeth

Look at any photo where light is harsh and teeth will be defined to the point where the gaps look too much.  Fine with a tiger – not so good with people.  I had added light and dark tones to each tooth (like the facets of a diamond where faces close to you look lighter, a tooth is not flat and their facets closest to the light will shine really bright.

This is actually how light reflects off of teeth, but it doesn’t work if you try to simulate it in a picture.

IMG_3290_crop3

This doesn’t tend to occur so dramatically with people who’ve had surgical tooth lightening.    The more flattering fix for this is to pull out pencil all but a trace of the edges of the teeth, to the point where the gaps almost disappear – be careful to only do this in the centre 2/3rds, otherwise it’ll look like they’re wearing a rugby mouth guard!

I’d forgotten about this and the teeth looked overworked – hopefully you’ll think they look better now.

Tone

The more time you spend away from a picture under development, the more you’ll notice where detail is incorrect  – its kind of an ongoing process right up to the last minute.  I’ve pulled tone out of Meghan’s cheeks because they looked like rouge had been applied.  I didn’t see this until I’d spent some time away from the picture.

To fix this I completely rubbed out what was there and re-applied it.  Bristol paper will allow you to do this if you haven’t applied too much pressure with the original pencil.  Courser paper may not be as forgiving.

Material shadowing

Shadowing has been added to the shirt to make it look more three dimensional.  Be careful how much you define clothing – overdo it and the viewer’s attention is pulled away from the face.   If you want to show off the clothes that’s fine, but if you want the wow factor in your picture to be the subject’s face, don’t go overboard on the clothes.

IMG_3290_crop4


Next Time

Completing the picture including:

  • Knowing when to stop.
  • Signing.
  • How to protect it.
  • How to store it.
  • Precautions to take when putting it online.
  • What you do next.

Also what I’m looking at doing next.

The next post was going to be ready 16th of February but I’m making significant changes to the picture and I don’t think it will be completed now until Saturday 23rd of  February so I’ll update the blog then.

This is one of my methods for doing a picture – it may not work for you and if you have methods you think work better for you, please share.

Thank you for reading, best of luck with your project(s), and if you’ve like what you’ve read please hit the like button.  Happy to hear your views whether its praise or critique.

Tarrah for now!
smiley-1306301-639x623


Standard
Art, Learning how to draw, Portraits

Drawing a Portrait – Stage 2

Hi and welcome back.

In the last blog, I went through how to start a portrait.  This blog shows stage 2 in my portrait process.

I’m going to show:

  • How you place the eyes, nose and mouth so they don’t look just plain weird.
  • How you use mathematics to recognise people and why this is important.
  • How your TV can help you draw better.
  • Why its better not to draw with your paper flat on a table.
  • How to test your drawing.
  • How to complete adding the outline.

Stage Tracing

Before we start, I’d mentioned stage tracing previously.  This allows you to time travel like you might do in Word with CTRL Z, by returning to a previous version.  Simply put, you trace what you’ve done so far.  If you find your picture isn’t going the way you want,  get a new sheet of drawing paper, and then a separate sheet of A4.  Take your pencil and scribble over the paper so that most of it is covered in pencil.  Tip: You’ll find this easier if you use the flat of the pencil lead by using the pencil on its side.

Once you’ve finished, get your new sheet of drawing paper, lay the pencil side of the paper you’ve just covered in pencil, pencil side down on top of it.  Then put your tracing on top of that.  Then draw over your tracing again, following the lines exactly.  Once you’ve finished, take away the tracing paper and and pencil sheet and you should have a copy of the tracing on your new drawing paper.   All that’s left it just to gently erase anything that’s not your original lines.

On with the picture …

Ok, back to the portrait, which should at the moment look something like this:

IMG_0237

How you place the eyes, nose and mouth

After the outline, the next most important thing is where the eyes, nose and mouth are positioned.  Maths comes in here believe it or not.  Whenever you see someone’s face, your brain stores the relative positions of the eyes, nose and mouth in a form of triangle.    When you see them next, be it in person, in a photo or in a drawing, your brain compares what it sees with its database of coordinates.  Once it finds a match, it knows who the person is, regardless of what angle you view them from (as long as you can still see their face).

If these aren’t correct in your drawing, then people simply won’t recognise who it is.  If they’re right, lots of other things can be wrong with your picture but they’ll still recognise who it is.

Look at the source photo, and see where the eyes are.  Draw the outline of each eye, not the eyelids or the eyebrows – just the outline of each eye.  Something like this:

IMG_0276

This is the eyes area blown up:

meghan stage 1 - zoom

meghan actual eyes zoom

You probably know that eyes aren’t round, at least not the part that you can see.  This is why you draw just the outlines.  The rest can be added later.  At the moment you just want them in the correct position – which is just about halfway down the face (including hair, which masks where the top of the skull is).

If you look carefully, you’ll see something else that’s odd, and which you have to try to replicate.  In fact if you look at it long enough you wonder how it can be? The eyes are not at the same level.  Put a pencil horizontally across the right eye so that its covered, then see how much of the left eye is still visible.  This is caused by Meghan cocking her head slightly and because she has ever so slightly elevated the left hand side of the face while smiling – otherwise her eyes would be at the same height.

Working out where the mouth goes

The first thing you do is work out where the centre of the bottom of the bottom lip is in relation to the bottom of her chin, and draw a rough line where you think it is.  Then referencing the photo, draw in a rough line where the centre of the top of the top lip is.

Look back at the photo.  Note what lines up with the extreme left and right edges of the lips, (the edges in this photo).  The centre of the pupil in Meghan’s right eye, and the extreme edge of the white of the eye in Meghan’s left eye.

Meghan eyes to sides of lips

You can now use these as visual guidelines when drawing the lips in.  Effectively its learning to draw what you see, but they’re handy references.

Now draw the outline of the mouth in – remember we’re just after checking everything is in the right place.  Tip: Notice in this photo, that because Meghan’s face is tilted, the mouth is at an angle.

I’ve drawn in light guidelines here to show where the lips stop:

IMG_0278

Kind of looks a little odd without the nose, but bear with me, that’ll all change with the next section.

Working out where the nose goes

With reference to Meghan’s photo, look for the lowest point of the nose and add a light upturned curved line to show where this is.  It makes an immediate transformation, especially if you appreciate Manga which always use minimalist  features.  You’ll build on this.  Now use the technique we used before and look for the extreme left and right hand edges of the nostrils and then add two light guidelines running down from the eyes.  Inside these two lines and a little way above the line you created before, draw two more curved lines for the outer edges of the nostrils, i.e.

meghan stage 2 - zoom
Now draw the remainder of the profile of the lower section of the nose.

meghan stage 3 - zoom

That’s the eyes nose and mouth in position, admittedly just the outline, but all you should do at this stage.  I wasted a lot of time in my early drawings adding detail because I was enjoying it rather than doing the basics and checking everything was in place.  Not much fun when you have to remove detail you’ve added or worse still start again.

bristol board


Tip: The smoother the paper you use, the easier it is to pull out detail you’ve added and move it or replace it.

I use Bristol Board which is just about the smoothest paper you can buy.


How your TV can help you draw better

Hang on I hear you say, isn’t this art stuff supposed to get me away from the TV?
Well yes, it will but that doesn’t mean it can’t help you.  If you HDMI up your laptop to the TV with a great long cable, you can display your source picture there.   If you have a smart tv, even easier – just find the photo on Google and display it.

What are the advantages to bothering?  You can draw at an easel, it just about replicates what it would be like to draw someone in front of you, and you get HD image quality in large format so you don’t lose a detail.

Why its better not to draw with your paper flat on a table.

Have you ever seen those pavement illusions where someone paints a swimming pool that isn’t there or something similar?  If you walk up to the image rather than looking from distance as you’re supposed to, it changes completely and the illusion is lost.

If you draw with paper flat on a table, unless the subject is flat on the table beside it, or you draw right overhead the driving, you’ll get distortion because you’ll have been working at an angle.  If you stand up the paper and look it, the portrait will either be lengthened or shortened.  This is why you should draw with the paper as upright as you can, as this minimises the chances of you adding distortion.  Try it out and see what happens.  You don’t have to do a full picture – just do an outline and you’ll see it for yourself.

How to test your drawing

This is really cool.  If you’re starting out by drawing from photos, this technique will show you how you can test any size drawing made from the original photo.  When would you do this?  If you have a small photo and want to draw from it, or you want to draw something larger than A4, you want a reliable easy way to check that everything in your drawing is in the right place.  This is how you do it.

1. Get an A4 acetate (clear plastic) sheet.
2. Reduce your source photo so that its smaller or the same size as your drawing.
3. Using a marker draw roughly around the face outline and the features you’ve added so far. (It looks really weird – you’ll get over it).

IMG_0288           IMG_0286

4. Take the sheet and hold it above your drawing.

IMG_0287
5. Move it closer until the eyes nose and mouth are superimposed.  (You’ll find this a lot easier if you close one eye).

If there’s a good match, you’ve got reasonable similarity between the positions of these features on your drawing and those in the photo.  If not, see which are the most accurate when compared to the face outline, and move the one that’s most wrong.  Obviously you have more work to do if there’s two out of position.

This will save you hours trying to work out what’s wrong.

The closer you can get the outlines of the features, the better your picture will be, so continue with this until you’re happy.

How to complete adding the outline.

Next add in rough outlines of as much as you can.

In this photo, Meghan’s right ear sits between the top of the visible part of her right eye and the tip of her nose.  This isn’t always true – how the subject has inclined their head, and their age affects this rough guide.  (People’s ears grow larger and longer as they age).

This is with minimum outlines added.

IMG_0290

The face outline looks a little out to me (at the top), but it can be corrected when the hair part of the outline is removed.  Most of the lines you currently see will be removed, as in reality, they don’t exist.

Its not worth outlining everything, in case you need to adjust things.  If the eyes, nose and mouth are correctly orientated with each other and the face outline is correct, this gives you more confidence to start on the next stage which is adding a little more detail to the features (eyes, nose, mouth and ears.  Once this is done you can start to add tone which will start to bring what is just a flat contoured picture to life.

Next Time …

I’ll be tackling these two areas next time.  If you’re following along, take a stage tracing if you haven’t done already, and try to get your picture to the same stage.

It would be great to know how your pictures are turning out.  If you have comments, questions etc, or would like to ‘like’ this article or follow it so you don’t miss the next one, you should be able to find buttons on screen to let you do this.

NB: The LIKE and FOLLOW buttons and links are hidden (a bit).  If you click the button with the three horizontal lines at the top of the blog, you should then see them.

Thanks for reading this.  I hope its been useful.

I hope that you can join me next time, and good luck with your drawing.

All the best.  Ian.  smiley-1306301-639x623

Standard
Art, Portraits

Stage 1 and no laughing

Hi and welcome back.

Those who read the last blog and have never drawn before may have done some drawing, out of curiosity.  If you did, how was it? Enjoy it? Hate it?  I guess if you really hated it you wouldn’t be reading this.

I have to admit I found it difficult to go back in time and draw something I hope I’ve picked up enough experience not to do ordinarily.  Its like trying not to ride a bicycle when you’ve learn’t.  Yoda would say Scarily comical drawing turned out it has.

Poor picture of Meghan Markle

Maybe you’ve repeated my mistakes, created your very own or perhaps you’ve got a fabulous drawing you’re proud of and discovered a hitherto undiscovered talent.  If you made mistakes, did you work out what you’d done?  (I do appreciate that maybe no one picked up a pencil).

I don’t how your drawings have turned out, so I can only reference my timewarp drawing and if you recognise similar issues, I’m going to try to give you some advice on either how to avoid the issue, or if its a technique which doesn’t usually work with portraits, explain what it is and why it should be avoided.  I’m only going over the main issues at the moment.

Positioning of the subject

Unless you’re going for a ‘thirds’ picture where you’re intentionally leaving lots of space to one side of the subject, its best to have the subject in the centre of the paper.  Probably best to avoid chopping of the top of their heads too, as I’ve done above.  More on ‘thirds’ in a later article.

Lines

Unless you play Borderlands a lot, you’re probably not used to seeing people with dark lines surrounding their features.  You can use them as guides, but they should be removed as best as possible before you’re picture is complete.  for this reason, its best to use a 2b or 3b pencil to lightly add them.   Sometimes, you cannot help but avoid using them, e.g. when the edge of the subject’s face is the same tone as the background and it looks like they’re fading into each other.  (A trick to get around this is to change the background colour).

I find that ink drawings are the exception to this and I tend to use lines in them, but only because it suits the medium.

Positioning of the subject’s features

Here, I mean eyes, nose, mouth and ears.  I’ve exaggerated not putting the eyes in the correct place.  Most people, (me among them at one time) think that a persons eyes are 3/4 of the way up the face.  They aren’t.  They’re just above the centre of a face. If you have a protractor handy, try positioning one of its points on Meghan’s chin, and then spin the other arm so its positioned in the middle of the eyes.  Then take the first arm off of the chin and rotate it around so its at the top.  See how close it is to the top of Meghan’s hair?  Its sometimes difficult to judge this when people have big hair.

Scarlett head only

From the line where the eyes are, the nose takes up a quarter of the full length of the head.  The mouth is roughly 1/5th of the length of the head when measured from the chin.  Scarlett’s head is inclined forwards here so you’re seeing more hair than you would normally see.

I thought the eyes being situated halfway down the head was weird, and it took me a little while to get used to positioning them correctly.

Flatness

scarlett tone


There is no tone anywhere in this picture.  Tone helps your brain recognise a three dimensional image from what is actually a two dimensional picture.  If its not there, everything looks flat.  Basically you need to show where light is not present fully.


The Eyes

Eyes are kind of almond shaped.  Irises are circular, so unless someone has their eyes wide open, you won’t see the top and bottom of their irises.

No catch light has been used.  This is a trick to make eyes look like, you guessed it – eyes, rather than dark shapes.  Usually it’s one but sometimes its more, very bright (white) areas in the eyes.  Usually these are on the pupils, but it depends where their eyes are looking and where the brightest light source is coming from.  You also see reflections of whatever is in front of the subject, though its more apparent in the lower half of the eye which is usually drawn lighter.

Scarlett Eyes only

If you know manga, then you’ll be used to seeing exaggerated catch lights in the character’s eyes.  Finally eyes tend to be darker at the top than the bottom because of shadow from the upper eyelids.

Mouth

I have of course exaggerated the width and size of Meghan’s mouth.  The other thing I’ve done is define each tooth.  Usually when you see portraits, you’ll see that teeth are almost blended together with very little marking to show individual teeth.  I usually show some because I think otherwise it can look like a subject has a mouth guard in.

Hair and eyelids

anjeline part head


Usually you’d try to use lines here, not to define individual hairs but to give an impression of the direction of the hair.


Scuffing

Look carefully and you’ll see there’s a sort of ‘dirty’ look to the picture.  This was caused because I didn’t cover the picture as I drew it.  Essentially you get a piece of paper – tracing paper if you can, to cover the part of the picture that you’re not drawing.  If you do this you’ll avoid the edge of your hand scuffing the drawing.

It would be great to know how your pictures turned out.  If you have comments, questions etc, or would like to ‘like’ this article or follow it so you don’t miss the next one, you should be able to find buttons on screen to let you do this.

Next time …

Starting a picture of Meghan, showing every stage. smiley-1306301-639x623

Have a good week.  Ian.


Standard