

Hi,
If you’ve been following this series, you’ll have seen how to draw a portrait of Meghan Markle to the stage shown below:

This blog takes things a little further.


So, what’s changed?
- Her hair and eyebrows have been more clearly defined and shine has been added.
- Blemishes have been added.
- Her teeth have been lightened.
- Tone has been applied to the area below the left side of her lower lip and centre of the chin.
- Material shadowing has been added to the shirt.
Hair definition
I’m not so good at free drawing hair but find that to make it look right, less is actually more. I feel that if you define every strand it complicates the picture and makes it look forced. They key is to get the hair tonally correct – light where it’s light and dark where it’s dark.
The light should follow the contours of the hair – where it’s closer to (you) it should be lighter. If you think of it as the crest of waves at sea, that’s where the lightest area is.
As an example, in the shock of hair close to the right cheek, the hair bows out above her eye. The fastest way to apply the light is to draw the hair in and then pull it out with a manual fine tipped eraser using a lot of pressure at the peak (or centre) and lessening as you move away in each direction so that the lighter area fades away slowly.
You may find this easier if you start off by drawing the lines in gently with a harder pencil so the lines are light, then go over the lines with a softer pencil. Keep doing this until you’re happy with the tone when compared to the photo.

Overall, I’m struggling with darkening down the hair enough – Meghan’s hair is very dark and here it looks mid toned, so if I did the picture again I’d concentrate on making the hair darker straight away.
Tearing
This picture has been drawn on what is called Bristol paper. It has an almost photographic paper feel to it’s surface. A problem with ultra smooth paper like this is that it can get ‘tired’ – overwork it too much (like trying to make the hair darker after a lot of work has been done) can tear the paper, and there’s nothing you can do once that’s done. You get similar damage over a wider area if you’ve gradually worn away the surface, which you can do by drawing pencil in, then erasing and so on.
Torn or worn paper has more heavily grained paper at the surface and it accepts pencil a lot more readily – if you try to add tone when you have a tear or worn area, it’ll look markedly more distinct where this is, and you’ll struggle to apply a uniform tone.
2nd Attempt is often better
The more you work paper with damage the worse it gets. I prefer to just stop working a picture when this happens and redraw the picture from fresh. This sounds catastrophic but it can be very helpful. If you redo a picture you’re likely to get a much better picture second time because your mind remembers the structure of the original and the mistakes you made, a little like knowing where potholes are in roads you use all the time when you’re driving.
Blemishes
It is alleged that Oliver Cromwell once instructed an artist to paint him ‘warts and all’ but there appears to be little actual historical proof that he actually said it. Its a little like the alleged quote by President Bush that the french have no word for entrepreneurialism. Probably never happened. Blemishes are a two edged sword – include them and the sitter will ask what they are as if the artist has invented them. Leave them out and the painting can be criticised as being unrealistic. I err on the side of adding them but kindly so they’re not too unflattering. I was once asked by a customer why they had a mark in the picture which they weren’t aware of (but was clearly there) – that took some talking I can tell you.
Teeth
Look at any photo where light is harsh and teeth will be defined to the point where the gaps look too much. Fine with a tiger – not so good with people. I had added light and dark tones to each tooth (like the facets of a diamond where faces close to you look lighter, a tooth is not flat and their facets closest to the light will shine really bright.
This is actually how light reflects off of teeth, but it doesn’t work if you try to simulate it in a picture.
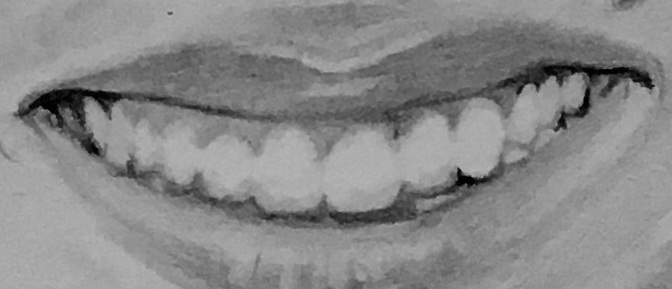
This doesn’t tend to occur so dramatically with people who’ve had surgical tooth lightening. The more flattering fix for this is to pull out pencil all but a trace of the edges of the teeth, to the point where the gaps almost disappear – be careful to only do this in the centre 2/3rds, otherwise it’ll look like they’re wearing a rugby mouth guard!
I’d forgotten about this and the teeth looked overworked – hopefully you’ll think they look better now.
Tone
The more time you spend away from a picture under development, the more you’ll notice where detail is incorrect – its kind of an ongoing process right up to the last minute. I’ve pulled tone out of Meghan’s cheeks because they looked like rouge had been applied. I didn’t see this until I’d spent some time away from the picture.
To fix this I completely rubbed out what was there and re-applied it. Bristol paper will allow you to do this if you haven’t applied too much pressure with the original pencil. Courser paper may not be as forgiving.
Material shadowing
Shadowing has been added to the shirt to make it look more three dimensional. Be careful how much you define clothing – overdo it and the viewer’s attention is pulled away from the face. If you want to show off the clothes that’s fine, but if you want the wow factor in your picture to be the subject’s face, don’t go overboard on the clothes.

Next Time
Completing the picture including:
- Knowing when to stop.
- Signing.
- How to protect it.
- How to store it.
- Precautions to take when putting it online.
- What you do next.
Also what I’m looking at doing next.
The next post was going to be ready 16th of February but I’m making significant changes to the picture and I don’t think it will be completed now until Saturday 23rd of February so I’ll update the blog then.
This is one of my methods for doing a picture – it may not work for you and if you have methods you think work better for you, please share.
Thank you for reading, best of luck with your project(s), and if you’ve like what you’ve read please hit the like button. Happy to hear your views whether its praise or critique.
Tarrah for now!

