

Hi and welcome back to my series of articles showing that it’s not as difficult as you might think to draw a portrait.
The following article shows stage 3 in my portrait process.
I’ts going to show:
- How to add tone to create a three dimensional effect.
- How to detail the mouth.
- What you can buy to make life a lot easier when you’re rubbing pencil out.
Adding Tone
This where we left the picture last time:

Everything looks flat. There is no third dimension at all.
This is part of a picture which has the third dimension added by using tone and shadow:
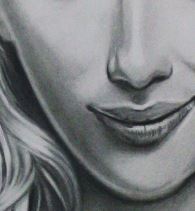
Darker areas represent parts of the face that have less light on them. The reason that there’s less light is that in reality three dimensional parts of the face get in the way of the light source, which in this example is coming from above and to the right.
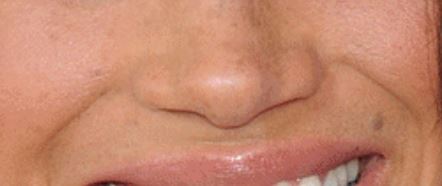
I’ll demonstrate how to do this by adding tone to Meghan Markle’s nose and mouth.
I look at the source photo and try to add tone so that its in the same place as it is in the photo.

The way you add the tone is with the pencil held on its side so only the edge of the pencil lead is contacting the paper, i.e.
If you can get hold of a 3D or 4D pencil, you’ll get better results.
If you’re keen to keep drawing it’s worth buying a small set of reasonable quality pencils which, if you get ten or twelve in the pack will range from quite soft (4B) to quite hard (4D). A larger set will run from 9B to 9D, which I don’t think I’ve ever used, so a set of ten or twelve should do you.

This is with tone starting to be added.
The whole area above the lips wants a little overall tone added, and then you start adding more so that the tone darkens where it darkens in the original picture.
See how the nose starts to give the illusion of projecting? This is the key product of adding tone. It starts to add contour to the drawing paper and gives an idea of the relative height of the nose above above the upper lip. Of course its illusion, but that’s what portraits,and drawings in general are all about – giving the illusion of form where it doesn’t actually exist – look at the paper from the edge and it all disappears. Your brain interprets what it sees and convinces you that the image is three dimensional.
Its quite difficult to prevent this happening, but you can do it. If you look at a button on a web page you’ll see lines around it, and a thicker line at the bottom. Some are a little more complex with smoothed in shading, but its still all it is. Your brain is persuaded to interpret it as 3D. If you look long enough at it, you’ll see what is really there which is a bunch of lines, and the same thing applies to drawings.
I’ve added tone to the lips but this is used in a different way. Generally you add pencil on to the lips and then take it away to show how the lip curves back towards the mouth. For the moment, I’ve just added overall tone to start things off, and left out a slim horizontal strip where there’s light reflection. Since this is pretty bright its best to not add pencil at all here, because in general, once pencil has been added you’ll never completely remove it, even with the smoothest paper.

Here, the following has been added (and removed):
- Lines defining the bottom of the nose have been darkened.
- Tone has been added around the mouth and chin.
- The dark shadow below the chin has been added.
- Pencil has been removed from the two horizontal lines on the tip of the nose, along with further removal in a curve just above the tip.
- More tone has been added to left and right of the top of the nose.
If you’re wondering how the lines on the nose have been erased, and pictured trying to do this with a standard eraser, this isn’t how it was done. For about £4 or so on Ebay you can buy one of these:

This is a Mono Zero by Tombow. Its like a mechanical pencil but has an eraser inside it instead of graphite. I use this to do very fine pencil removal. It may well be the best equipment investment I ever made. Once you’ve used one, you’ll be wondering how you ever managed without one. The bits above the eraser are one of its refills, and the carry case the refills come in. If you’re buying one, buy some refills at the same time. No good getting to the point where you can’t do without it and then find you’ve run out of refills!
Drawing the teeth in
The next stage is drawing in the mouth detail. Drawing in the teeth may look daunting but it doesn’t have to be.
The first thing you do is lightly draw in the V shape in the gum below the tip of Meghan’s nose. Putting this in the correct position is key to getting the teeth correct.

If you look down from the centre of the tip of her nose , you can project a line downwards so that it hits the right hand side of the V. Now, like arches in a Roman viaduct, draw in the V shapes either side, bearing in mind that the left one (to you) drops away to the left hand side because the minor incisor on the left hand side is 3/4 of the size of it’s namesake on the right hand side. (Unless you’ve had a lot of orthodontic work, or your DNA is particularly blessed its unlikely that your teeth are symmetrical in size and position).
Notice that you’re not drawing the teeth in – you’re drawing in the gums and a little further down, the inside of mouth.
The areas to the extreme left and right have no tooth to draw around. The teeth change their facing as they progress left and right, so that when it comes to the molars at the back, which you can’t see, they are facing sideways.
Now continue along drawing the rest of the ‘arches’ in. Technically you’re drawing in what is called negative space. This is what surrounds an object, which in this case is the teeth. Once you’re happy with these, you can start adding negative space to build the lower edges of the teeth. Notice in this picture there are virtually no lower teeth to ‘draw’ in at all. The reason for this is that Meghan is halfway between a grin and a wide smile. (There are however glimpses of lower canines and a premolar).
Once you’ve got the lower negative space done, you can draw in the edge of the teeth to stop it looking like she’s wearing a gum-shield. Be careful doing this. If you draw in exactly the same tone as you see in the photo it won’t work. This is a peculiarity of portraits. Teeth just don’t look right if you draw them in accurately, because against white paper, the dark areas between the teeth just look too dark and make it look like someone has awful teeth.
To get around this, use very light shading to separate the teeth, and once you’ve done it use an eraser to gently remove most of the lines that you’ve made. Trust me – it works.
Now go back to the left and right of the mouth and draw in any detail that’s currently missing, and add slightly darker shading to show the parts of the mouth that are completely in shadow. You should end up with something like this:

I don’t fool myself by thinking that this is perfect but its a reasonable start.
Next Time …
I’ll be focusing on:
- How to complete the mouth.
- How to start on the eyes, ears and hair.
- What a tortillon is and how you can use it to improve your pictures.
- How to find a local art club and what you could expect from it.
If you’re following along, it would be useful if you could try to get your picture to the same stage.
It would be great to know how your pictures are turning out. If you have comments, questions etc, or would like to ‘like’ this article or follow it so you don’t miss the next one, you should be able to find buttons on screen to let you do this.
NB: The LIKE and FOLLOW buttons and links are hidden (a bit). If you click the button with the three horizontal lines at the top of the blog, you should then see them.
Thanks for reading this, and I hope its been useful.
Best of luck with your drawing and I look forward to seeing you next time.
All the best. Ian. 
